Protect your Blog Pages By a Temporary Token Using Cloudflare Worker
Updated: Oct 20th, 2023
When building a blog system, we often want to privately share certain pages with others. This means that only individuals with the link can view those pages.
This feature is commonly found in mature products like Google Docs, Notion, and Yuque. However, it can be challenging to implement when creating our own blog systems.
Today, I would like to share an easy method for protecting your public blog page using a temporary token.
Here is an example :
-
https://0x10.sh/p/token-test-page
- The page cannot be viewed by others because the correct token is not provided.
-
https://0x10.sh/p/token-test-page?t=eeda5909d0e4ba80684e670a8a4f
- The page can be viewed by others because the correct token is provided and it has not expired.
What I Want to Achieve
- Per-page token: Each page should have a unique token.
- Token expiration: Once the token expires, users should no longer be able to access the content.
- Invalidating tokens: To invalidate a token, simply change the secret in the worker.
- Practicality: It would be helpful to have an easy way to generate
tokens using local scripts.
- Using Obsidian: I have discovered a quick method for adding sharable url with token to front matter in Obsidian.
Prerequisite
- Your blog system is proxied by Cloudflare.
- You have a basic understanding of JavaScript programming.
- For instance, although I haven’t formally learned JavaScript, I do have experience in programming with C++. Additionally, I am familiar with using Google and Stack Overflow to assist me in my coding. This knowledge is sufficient for me to write JavaScript code and implement the desired feature.
Understand the cloudflare worker
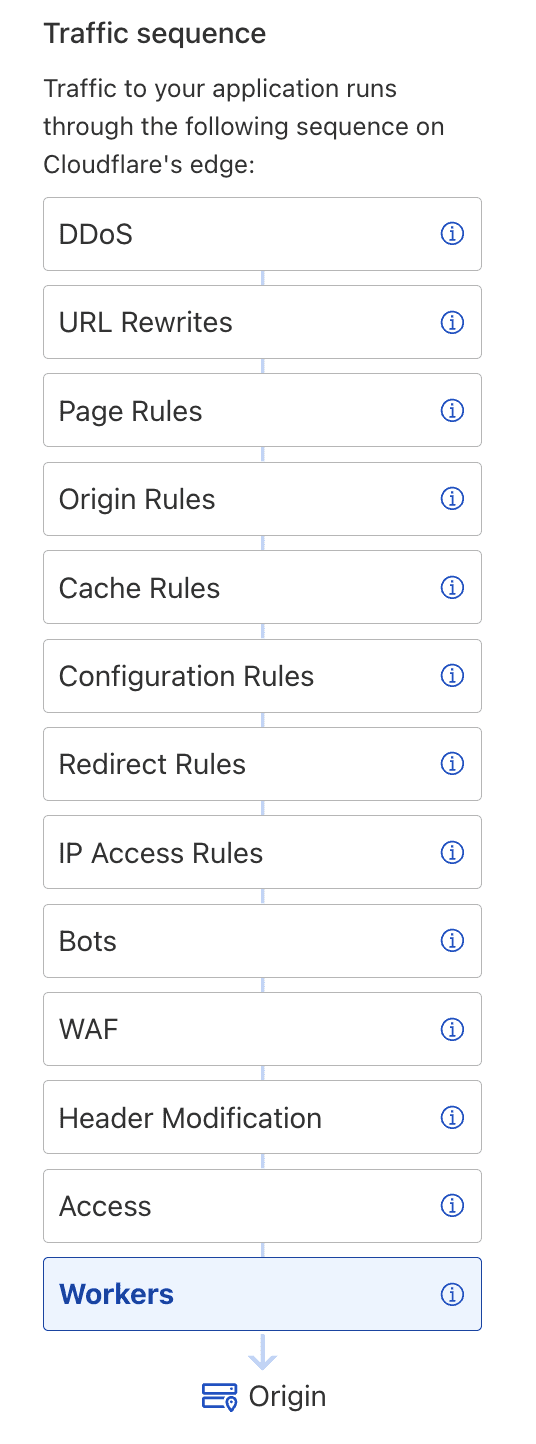
If your blog page is proxied by Cloudflare, you have access to various tools that allow you to control incoming requests and add customized logic to implement desired features in your blog system. For example, in Cloudflare, the traffic sequence is shown in the Cloudflare document.
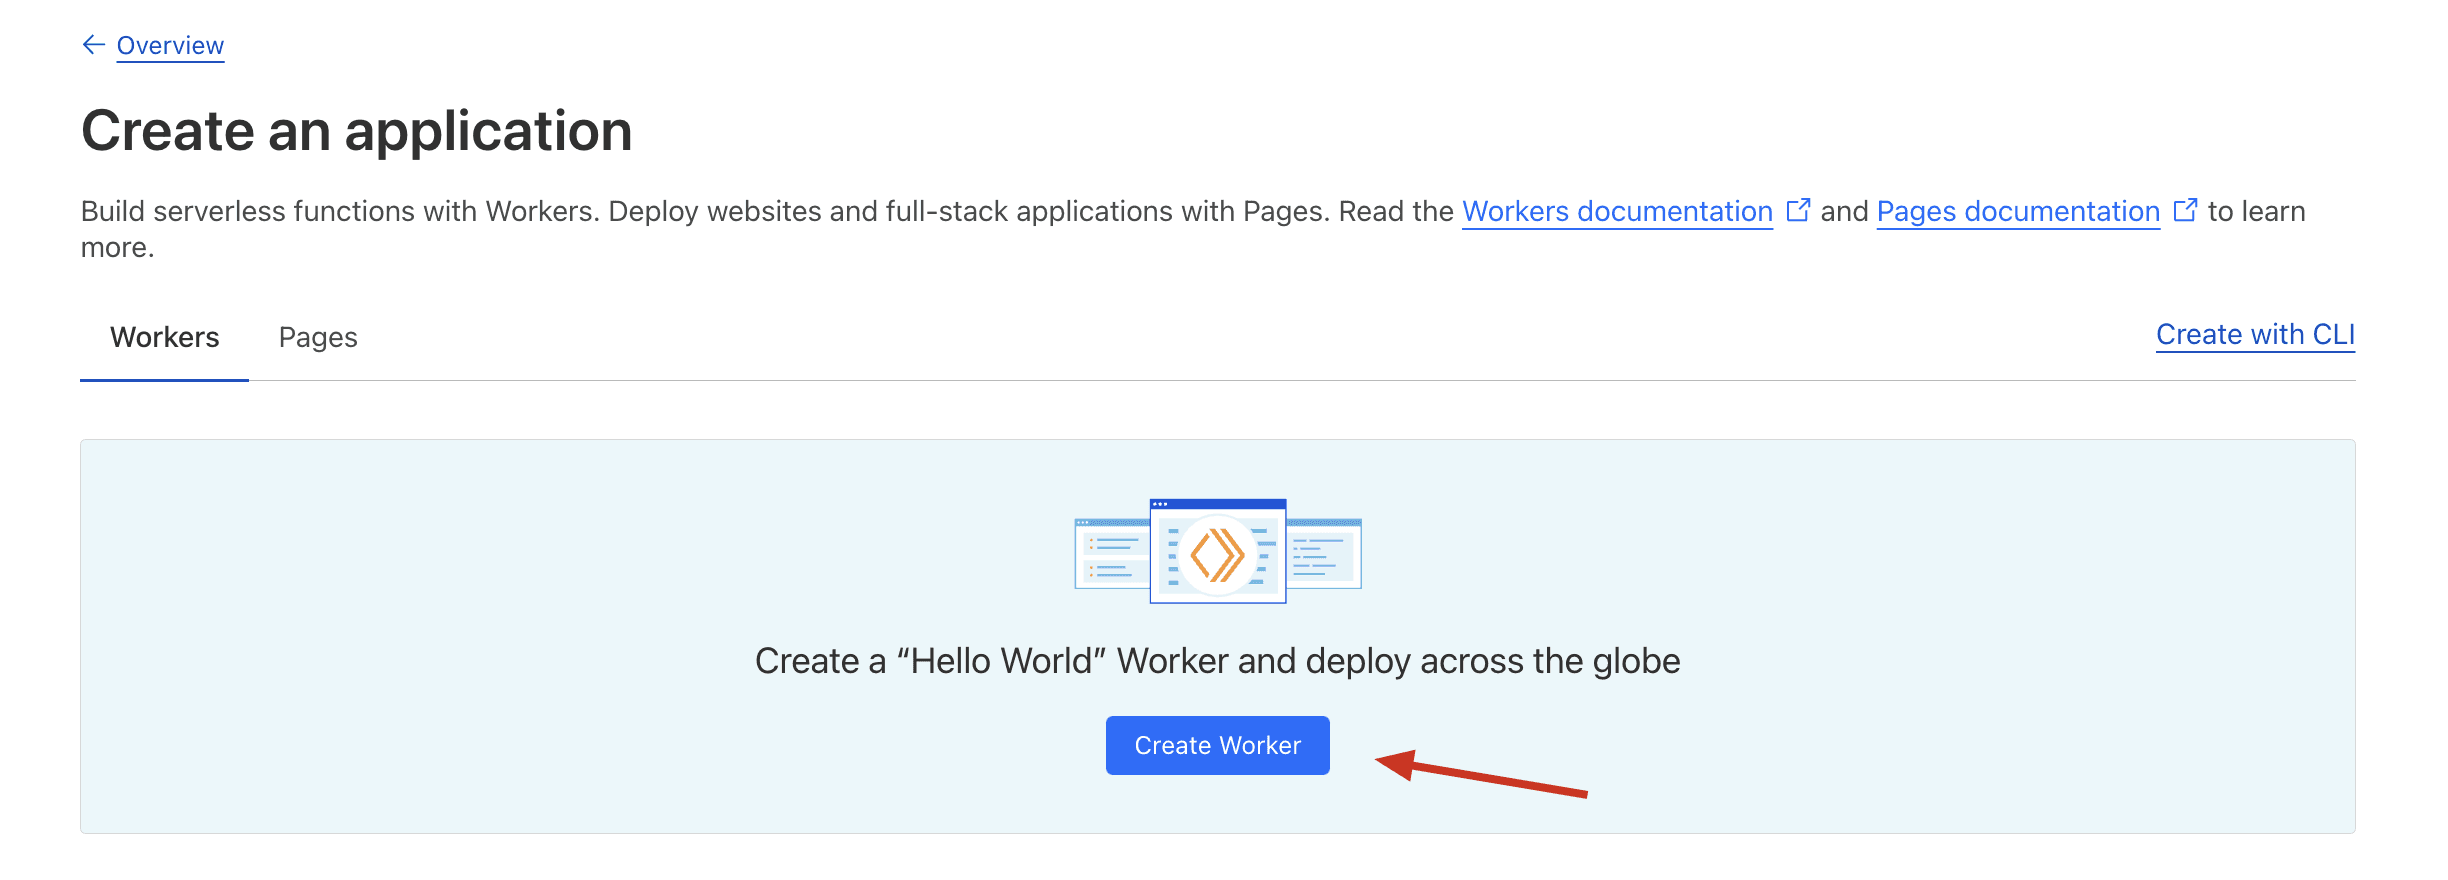
Cloudflare Worker is a powerful tool provided by Cloudflare, and it is free for up to 100,000 requests per day. To get started, you can test the Hello World worker on Cloudflare.
We will now proceed step by step to create a stronger worker capable of safeguarding our blog using temporary tokens.
Level 1 : Protect Your Blog with a Static Password
Now we use a simple worker to help you understand how workers works.
Using Cloudflare Worker: A Simple Example
To help you understand how workers work, we will use a simple example.
For each incoming request to your blog page, we can route it to our Cloudflare worker. The worker is a piece of JavaScript code that allows us to implement various features. For instance, if you want to protect your page with a static password, you can write a JavaScript worker. In the code, you can extract the password from the URL parameters and compare it with your private password. If they match, the worker can grant access by turning on a green light for this request. Otherwise, the worker can block the request and return a 404 error to the user.
https://0x10.sh/test-page?password=user_provided_password
export default {
  async fetch(request) {
    const private_password = "testpassword";
    const url_404 = "https://0x10.sh/404"
    const url = new URL(request.url);

    if (!url.searchParams.has("password")) {
      // do not provide password
      return Response.redirect(url_404, 301);
    }

    // extract password from https://0x10.sh/test-page?password=user_provided_password
    let get_password = url.searchParams.get("password")
    if (private_password == get_password){
       // console.log("ok")
       return fetch(request);
    }
    // the password is wrong
    return Response.redirect(url_404, 301);
  },
};
Add a route to make your worker works
To ensure that only certain pages are protected, you can utilize the
route feature. By creating a route rule with a specific prefix, you can
direct the worker to check the password for URLs that match this prefix.
For instance, in this example, we make all pages prefixed with
0x10.sh/p/ protected by this worker.

Level 2: Use a per-page Token
Using only a static password is a naive method because if the password is leaked or shared with someone, it puts all your private content at risk.
To enhance security, we can utilize a token generated by a hash algorithm.
Here’s what I do: I combine a secret string with the pathname and generate a digest using the sha256 algorithm. Each page has a unique digest, which acts as a per-page token. If this token is leaked, only the content of that specific page will be compromised. The sha256 algorithm cannot retrieve the secret string.
To implement this, we can include a token parameter in the URL, like
http://0x10.sh/test-token?t=09d0e4ba80684e670a. The
corresponding worker code is provided below. All necessary details are
included within the code and no further explanation is required.
export default {
  async fetch(request) {
    // https://developers.cloudflare.com/workers/examples/signing-requests/
    const secret = "YOUR SECRET";
    const url_404 = "https://0x10.sh/404"
    const url = new URL(request.url);
    if (!url.searchParams.has("t")) {
      return Response.redirect(url_404, 301);
    }
    let token = url.searchParams.get("t")
    const all_content = secret + url.pathname;
    // console.log("all_content : ", all_content)

    const my_hash_content = new TextEncoder().encode(all_content)
    const digest = await crypto.subtle.digest({
        name: 'SHA-256',
      },
      my_hash_content
    );
    // Turn it into a hex string
    const hexString = [...new Uint8Array(digest)]
      .map(b => b.toString(16).padStart(2, '0'))
      .join('')
    // console.log("digest (hexString) : ", hexString)

    if (token == hexString){
      // console.log("ok")
      return fetch(request);
    }
    // Incorrect key supplied. Reject the request.
    return Response.redirect(url_404, 301);
  },
};
Level 3: Use a temporary token with a expiry date
If the token is valid permanently, it becomes difficult to control the page and make it private again. To address this issue, we can set an expiry date for the token.
To make that happen we can include an “expiry” parameter in the URL:
http://0x10.sh/test-token?t=09d0e4ba80684e670a&expiry=1697644998
The “expiry” parameter represents a Unix timestamp in seconds.
To implement our system, we use the sha256 algorithm to generate a unique token for each expiry date. This process involves a secret string, pathname, and expiry date. Users must provide both the expiry date and its corresponding token in order to access protected content. It is not possible for users to modify either of these values to bypass security measures. Only individuals with knowledge of the secret can generate valid tokens.
export default {
  async fetch(request) {
    // https://developers.cloudflare.com/workers/examples/signing-requests/
    const secret = "YOUR SECRET";
    const url_404 = "https://0x10.sh/404"
    const url = new URL(request.url);

    // Make sure you have the minimum necessary query parameters.
    if (!url.searchParams.has("t") || !url.searchParams.has("expiry")) {
       return Response.redirect(url_404, 301);
    }

    let token = url.searchParams.get("t")

    // The Date.now() static method returns the number of milliseconds elapsed since the epoch,
    // which is defined as the midnight at the beginning of January 1, 1970, UTC.
    const expiry = Number(url.searchParams.get("expiry"));
    var now_seconds = Math.round(Date.now() / 1000);
    if (Number.isNaN(expiry)){
      // console.log("expire is invalid")
      const body = `expire is invalid`;
      return Response.redirect(url_404, 301);
    }
    if (now_seconds > expiry) {
      // console.log("is expiried")
      return Response.redirect(url_404, 301);
    }

    const all_content = secret + url.pathname + expiry;

    const my_hash_content = new TextEncoder().encode(all_content)
    const digest = await crypto.subtle.digest(
      {
        name: 'SHA-256',
      },
      my_hash_content
    );
    // Turn it into a hex string
    const hexString = [...new Uint8Array(digest)]
      .map(b => b.toString(16).padStart(2, '0'))
      .join('')

    if (token == hexString){
      // console.log("ok")
      return fetch(request);
    }
    // Incorrect key supplied. Reject the request.
    return Response.redirect(url_404, 301);
  },
};
Level 4: Concealing the Expiry Date Within the Token
It is strange that the URL is excessively long and contains too many parameters.
We can conceal the expiry parameters within the token parameters and only use part of the sha256 digest (which is also safe too), thereby shortening the token.
We no longer need to include the expiry parameter in the URL. Instead, we can simply append the expiry unix timestamp to the token.
Generating Token on the Client Side
To generate a valid token, you can run a script on the client side and share the URL with people you trust. The specific method may vary depending on your preferences. Personally, I use the Obsidian Plugin called Templater and write some JavaScript code to generate the token. This code then automatically appends the valid URL to the front matter of my note. Are you interested in how it is implemented?
In the reading view, the URL can be clicked.
Conclusion
It is done !
By the way, there are other methods to protect your page, such as Cloudflare Zero Trust or leveraging the OAuth API of platforms like GitHub and Google. Tutorials for these methods will be covered in future blog posts.